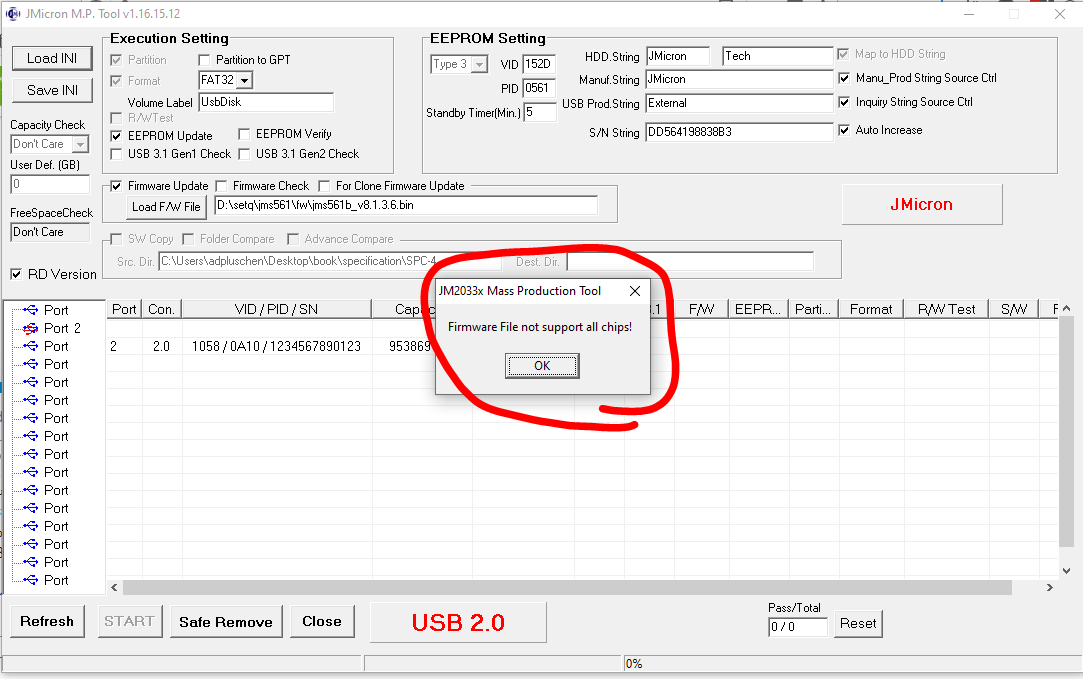
How to upgrade F/W with jms561 under Windows

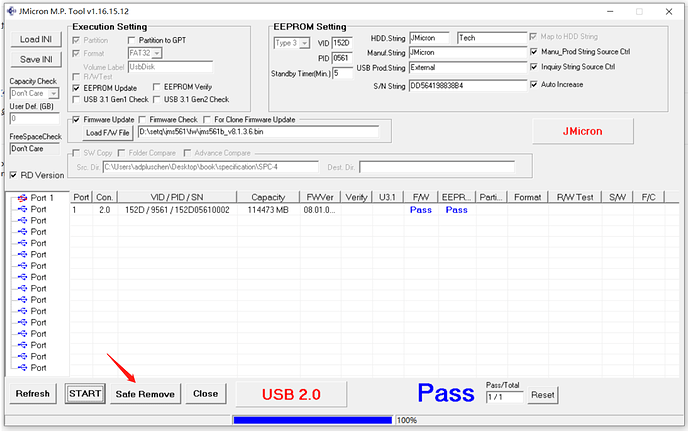
The following describes how to update the jms561 firmware under windows.

Updating the firmware in windows has the great advantage of having two different serial numbers.

The different serial numbers can solve the problem of only two drives showing up in the OMV5.

0. Preparatory work

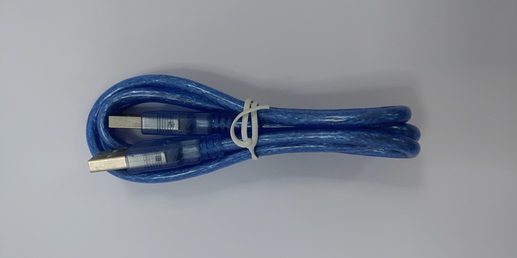
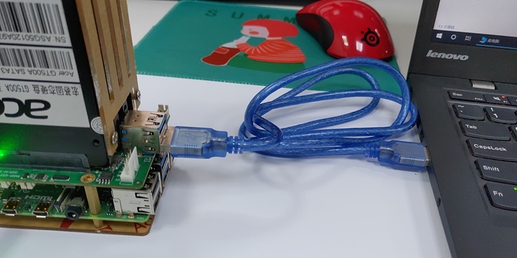
You need to prepare an A-A cable and use it to connect Quad SATA Hat to your Windows PC.


Note that you need to supply power to Quad SATA Hat.

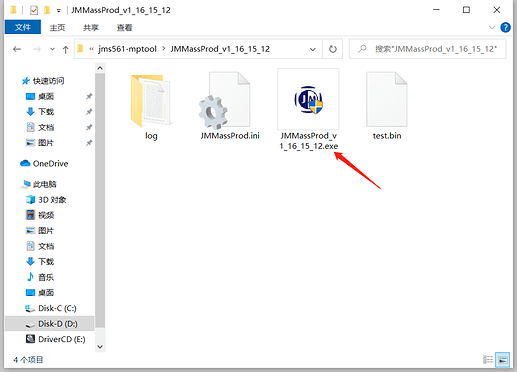
1. Download Jms561-mptool.zip and unzip it.

2. Launch MP Tool

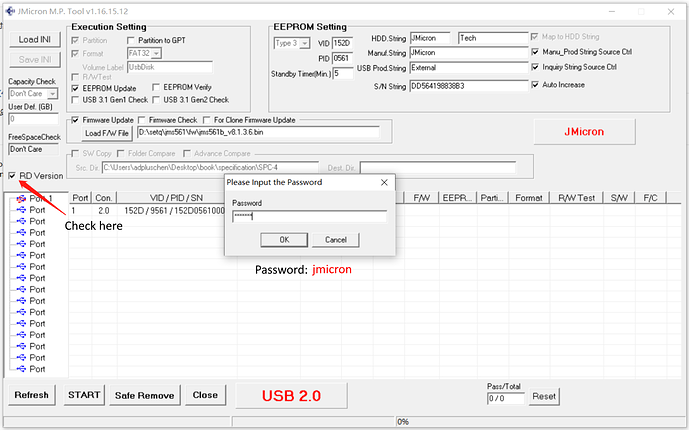
3. Check “RD Version” and load firmware


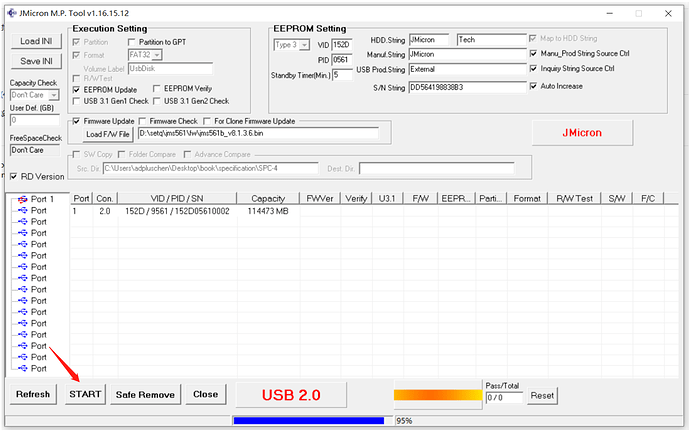
4. Start MP process

5. Safe remove

6. Connect another USB port and upgrade the firmware

7. Remove power

Hi, while trying to upgrade the firmware, I am getting error messages and I am not able to proceed!
Here are my steps:

  1. I connect the USB between my PC and the HAT through A-A USB cable.

  2. I power the HAT

  3. I start the MP Tool

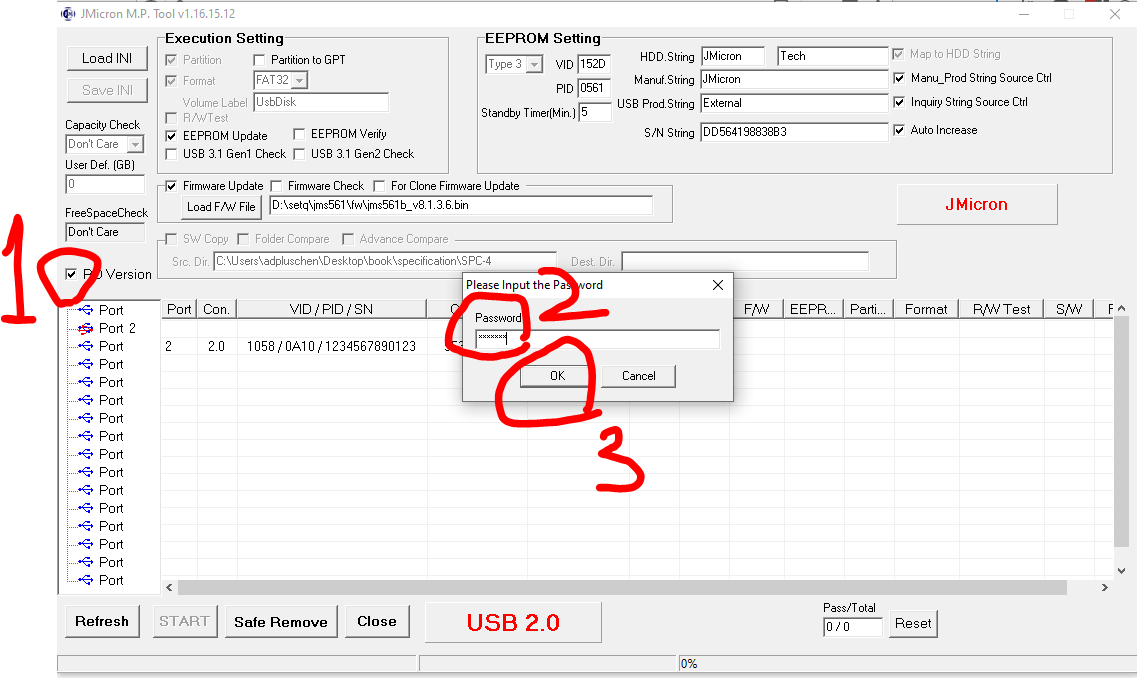
  4. I select RD Version & enter password: jmicron

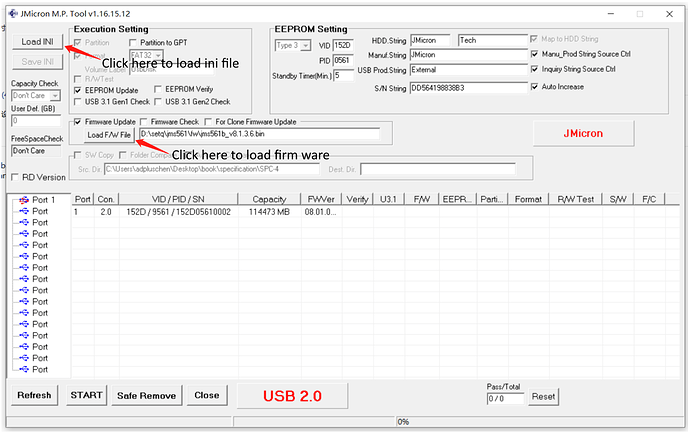
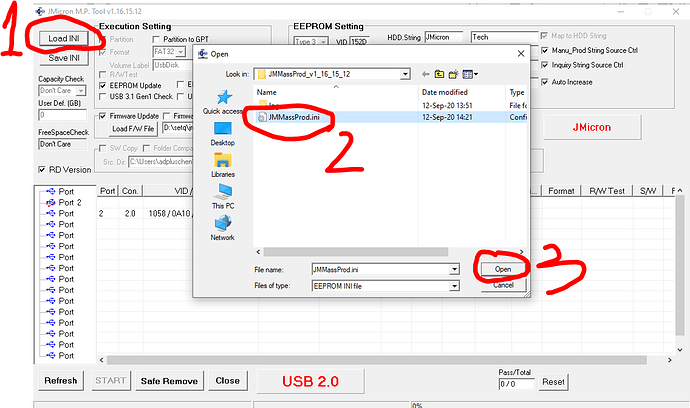
  5. Then I select the INI file:

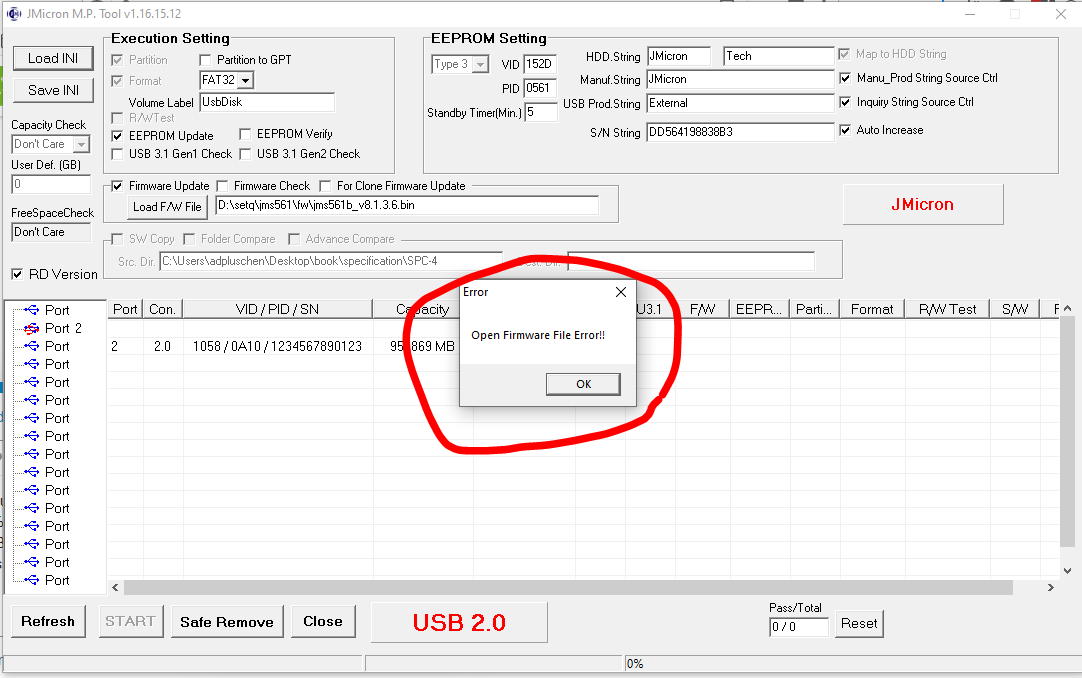
  6. After that I get an error message:

  7. After pressing “OK”, I get another error message:

  8. After this “OK” I get to the initial screen (I am not allowed to post a fifth image?!?)

  9. The same situation with the other USB

Please help!
VT&VT

Here is the final /initial screen:

You need to click on the “Load F/W File” button.

I have success!
Here is an update for the people that may come to this situation after me - I have managed to do it when selecting ONLY “Load f/W File”, finding the file and NOT searching for the INI file. Then START.

I got the same error message when I tried to select INI file.

Anyway - now my FW is ok.

Thank you setq!

1 Like

I’m not sure I understand step 6. How do we do the upgrade after we safe remove?

Hi all,

It’d be nice if anyone took the trouble to explain how to do the update properly.

I keep getting the same error messages as VT_VT…

The message of setq doesn’t help. Clicking on the “Load F/W File” button, then what? Select “test.bin”, the only file in the folder that seems to be of the appropriate format?

The last message of VT_VT does not help either…

I think one proper tutorial would go a long way helping people trying to update their firmware.

Thanks

i am trying to do this update of the JMS561 in the SATA hat from a Windows 10 system.

Using a USB 3.01 Type A Male to Type A Male cable (as in the picture in the instructions) I am unable to get the JMS recognized by the Windows 10 system. Using a USB port directly on the laptop, to avoid hubs, I get "Unknown USB Device (Port Reset Failed) on either of the two USB connectors on the drive board.

The JMS561 application does run, but does not recognize see the JMS561.

Are there drivers I need to load onto the Windows 10 system to enable it to see the device, or would you see there as being a problem with both of the chips or the connection?

Neither JMS is seen through a USB 3 powered hub, only through a direct connection to the laptop port.

I had to plug in several times to get recognized under Windows 10. And after a little time it showed up in the FW program.

But you can do it under from your Linux. You just have to connect a HDD to the SATA port to upgrade it. You can swap the HDDs so each SATA port could be upgraded.

A little a discovery when you upgrade it under Windows: SATA2 and SATA4 ports not working

I was able to get through, with patience and ensuring I used a Type-C charger that could output multiple voltages, if called for by the HAT. I noted that dmesg had indicated a low voltage message, even though I was powering through a bench power supply that could do 5 volts at 6 amps. With this the draw was into about 2.4 amps (spikes may have been more). Noting that the latest HAT now has a 12V barrel connector and the boards otherwise seemed very similar, I wondered if a Type-C charger, with a higher voltage possibility might help, and it seems that it does. I no longer have the low voltage error on the Pi.

I have 3 drives in the HAT, but only get a single one recognized, and a single JMS561 controller.

I believe that my HAT might be damaged, since I get no lights on 3, blue on 1,2,4 and red on 2, so I have ordered a new HAT (with the 12v barrel connector on the suspicion that I have a damaged HAT as well.

Thanks for the help.

Hi there, @setq
I don’t get a connection to my Windows PC (Win10 or Win11) and tried quite a lot of different cables (A-A) and (C-A) with multiple adapters, nothing works. It remains as nothing is connected. If I use a C-A cable (adapter), the system claims “Unknown USB Device (Port Reset Failed)” same as @oket had

How did you establish the connection between Windows and the Quad SATA Hat?

I too am having issues updating the firmware. I have connected the HAT as described using an A-A USB 3 cable, but the HAT either doesn’t appear in the software at all, or the PC doesn’t recognize the device.

Can we get some clarification on this please?

A-A (= non 1:1 wiring) are known to not work as 1:1 wiring is needed

btw
I did the update not under Windows
I upgraded F/W with jms561 under Raspberry Pi
it worked flawless for me
why not to give it try

1 Like

Hello,
I just specially registered to say - BIG Thank You! :heart:

I had broken WD My Book Duo with this JMS561 controller. Windows recognized it as a JMS56x USB device, but cannot do anything with it (or plugged HDDs). Zero helpful information on the Internet, most recent driver (but only default, not available dedicated), PCB or replacement of course not available, also not recognised by Western Digital Dashboard… But after overwriting by this firmware - it worked! Now it is visible JMicron Tech SCSI Disk Device :slight_smile:

Additionally - I don’t know if the problem is still up-to-date, but My Book cases supported only WD drives. To bypass it, Winbond chip had to be excluded. Now it also work with my Seagate HDD :wink:

Kudos!

EDIT:
oh, and v158.001.000.003 it’s even better, because it uses usbstor.inf driver (instead of uaspstor.inf), so it’s recognised properly.

1 Like

What MyBook Duo do you have? I’ve rewritten the JMS561 firmware on a 20TB version and now one drive bay works with any brand of HDD but the whole unit gets stuck in an endless boot loop if there is a HDD in the other bay.

Did you try this firmware with the Winbond chip still in the circuit?

Thanks.

I have a usb to sata dual drive enclosure as below,
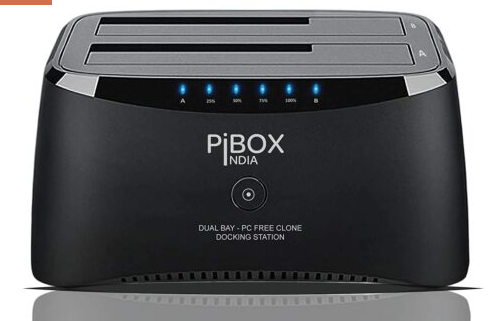
image

I use this on a raspberry pi 4. Occasionally the drives are not accessible and when I check, sudo dmesg -T I see messages

usb 2-2: reset SuperSpeed USB device number 2 using xhci_hcd

in every 30 seconds, a quick reboot mostly resolve this problem

Below are the device details,

pi@pinas:~ $ lsusb
Bus 002 Device 002: ID 152d:1561 JMicron Technology Corp. / JMicron USA Technology Corp. JMS561U two ports SATA 6Gb/s bridge
Bus 002 Device 001: ID 1d6b:0003 Linux Foundation 3.0 root hub
Bus 001 Device 002: ID 2109:3431 VIA Labs, Inc. Hub
Bus 001 Device 001: ID 1d6b:0002 Linux Foundation 2.0 root hub
pi@pinas:~ $ lsusb -ttt
/:  Bus 02.Port 1: Dev 1, Class=root_hub, Driver=xhci_hcd/4p, 5000M
    |__ Port 2: Dev 2, If 0, Class=Mass Storage, Driver=usb-storage, 5000M
/:  Bus 01.Port 1: Dev 1, Class=root_hub, Driver=xhci_hcd/1p, 480M
    |__ Port 1: Dev 2, If 0, Class=Hub, Driver=hub/4p, 480M
pi@pinas:~ $ lsusb -vvv

Bus 002 Device 002: ID 152d:1561 JMicron Technology Corp. / JMicron USA Technology Corp. JMS561U two ports SATA 6Gb/s bridge
Couldn't open device, some information will be missing
Device Descriptor:
  bLength                18
  bDescriptorType         1
  bcdUSB               3.00
  bDeviceClass            0
  bDeviceSubClass         0
  bDeviceProtocol         0
  bMaxPacketSize0         9
  idVendor           0x152d JMicron Technology Corp. / JMicron USA Technology Corp.
  idProduct          0x1561 JMS561U two ports SATA 6Gb/s bridge
  bcdDevice            0.01
  iManufacturer           1 PiBOX India
  iProduct                2 PiBOX USB DATA Unit
  iSerial                 5 20230713026E
  bNumConfigurations      1
  Configuration Descriptor:
    bLength                 9
    bDescriptorType         2
    wTotalLength       0x002c
    bNumInterfaces          1
    bConfigurationValue     1
    iConfiguration          4
    bmAttributes         0xc0
      Self Powered
    MaxPower                8mA
    Interface Descriptor:
      bLength                 9
      bDescriptorType         4
      bInterfaceNumber        0
      bAlternateSetting       0
      bNumEndpoints           2
      bInterfaceClass         8 Mass Storage
      bInterfaceSubClass      6 SCSI
      bInterfaceProtocol     80 Bulk-Only
      iInterface              6
      Endpoint Descriptor:
        bLength                 7
        bDescriptorType         5
        bEndpointAddress     0x81  EP 1 IN
        bmAttributes            2
          Transfer Type            Bulk
          Synch Type               None
          Usage Type               Data
        wMaxPacketSize     0x0400  1x 1024 bytes
        bInterval               0
        bMaxBurst              15
      Endpoint Descriptor:
        bLength                 7
        bDescriptorType         5
        bEndpointAddress     0x02  EP 2 OUT
        bmAttributes            2
          Transfer Type            Bulk
          Synch Type               None
          Usage Type               Data
        wMaxPacketSize     0x0400  1x 1024 bytes
        bInterval               0
        bMaxBurst              15

I was wondering if the same instructions here can be used to upgrade the firmware on this device.
If it uses same chip then yes, in fact it’s same thing in different case and some added small features.
but this probably will not help, I tested more than four different firmwares and all of them had some issues, none was stable. Some have broken SMART, others are not stable with UAS mode. Some users claim that it’s ok with some drives, none of mine worked stable.

Turn off UAS mode and retest it. Transfers will be bit slower, but still acceptable. Should be more stable and maybe s.m.a.r.t will work.

How do I check what is the firmware version on my device?
How to get the latest firmware?
How to turn off UAS?

There is no something like “latest” firmware, each vendor has own product and firmware was updated for that one. Some has some changes to basic version, some useful information were published on odroid cloud shell wiki

get id of device with lsusb command, add it to usb-quirks as parameter, then reboot and verify if there is message that UAS is disabled. This will use different driver and protocol, bit slower but more stable.