Multi-Zone Heating Control via Radxa Zero

Hi All,

Some background, I’m a long time unix systems engineer working at a manufacturing facility. Reading about this project piqued my interest.

The challenge: how to provide remote access and control of area specific heating zones. This is especially useful as we have been on rotation for the past two years and not all zones need to be heated to a comfortable level each day. Conversely, when an area is going to be active unexpectedly, it would be helpful to see the current temp and increase it as needed before heading in.

As noted in the linked project, commercial options are available but are neither integrated nor readily customised. Furthermore, they are prohibitively expensive across multiple zones.

The solution: employ a SBC to provide both climate controls and an integration platform. After evaluating a number of solutions, the Radxa Zero became my board of choice.

For those looking to implement a similar solution, my bill of materials is as follows (pricing in USD from Feb-March 2022).

51.95 : Radxa Zero w/ 4GB RAM and 16GB emmc storage, source Ameridroid
20.65 : 7 x DS18B20 Temperature Sensors*1, source Ameridroid
3.95 : 10W power supply (5V @ 2A), source Ameridroid
3.95 : USB A to USB C cable, can we ever really have enough of these? Source, Ameridroid
0.95 : small heatsink, source Ameridroid
8.99 : Inland 8 channel 5V relay, source Micro Center
4.99 : Inland 20cm Jumper Wire - 3 pack, source Micro Center
24.40 : Bud Industries NEMA 15x15x9cm ABS Enclosure p/n NBF-32210, source Mouser
0.60 : 6 x TE 4.7k Ohm carbon film resistors p/n CFR25J4K7, source Mouser
6.00 : 2 x mini breadboard, source Makers Portal
5.50 : assorted M6 screws & nuts, nylon spacers, small self tapping screws, and a 14 pack of 22-14 AWG wire connectors, source nearest hardware store
20.55 : combined shipping costs from all vendors
-----
152.48 Total

A small piece of plywood backer board and wood screws were already available onsite.

*1 Note as indicated in the inspirational project, sourcing quality DS18B20 sensors is critical if you need to use parasitic power. As a result, the first sensors were purchased from Mouser and made by DFRobot. These did not work with parasitic power when wired as documented (or wired any other way). The Ameridroid sensors from Shelly do work with parasitic power. I ordered extra in case 1-2 were bad. All the sensors worked when wired with all three wires (+/-/sig). For my use case, most sensor locations only have two wires already in place, thus necessitating parasitic power or a big bill from an electrician to run more wires.

As this was my first time working with the R0, I decided to install Debian 10 with XFCE rather than Ubuntu server without X. The initial system memory usage was around 340MB with storage use of about 2.2 GB.

I ended up using the side of a spundger to press the R0 usb boot button.

Erasing the emmc and installing Debian took < 15 mins and then I was looking at XFCE on our home TV running on the R0!

The 34x20mm heatsink was at least 2X too large, so the following day, I cut it in half in both directions then filed the edges and used superglue to connect the fins together. Thermal pads keep it stuck to the CPU and much of the RAM:

As the R0 will live in a sealed enclosure in an utility room with the waste heat of a hydronic boiler, additional cooling seemed like a wise step. Observed temps are between 36-43C concurrent with load and room ambient.

A sysadmin friend had directed me to Hass.io / Home Assistant (HA), so the next day I installed the docker version onto the R0. This roughly tripled the space used to about 6.5 GB, this can be reduced by cleaning up the docker installation files, however when updating that space will be used again. Remarkably, RAM usage is still < 500 MB with ~10% used by the HA docker and associated processes.

After getting some idea of the YAML files HA requires and stubbing out some base configurations, I plugged in a few DS18B20 sensors to get OneWire working. There wasn’t an overlay readily available for this, but thankfully after a visit to the forum @RadxaYuntian responded to my request and provided the needed dbo and source. That did the trick, as temp output was now available:

$ cat /sys/devices/w1_bus_master1/28-*/temperature
20250
19687
20000

btw: this is also symlinked to /sys/bus/w1/devices

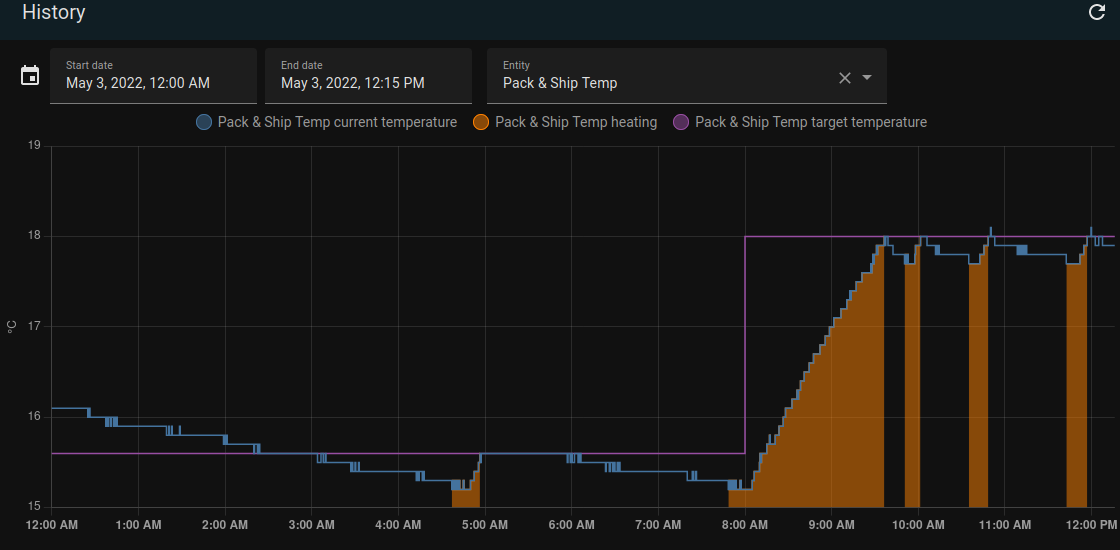
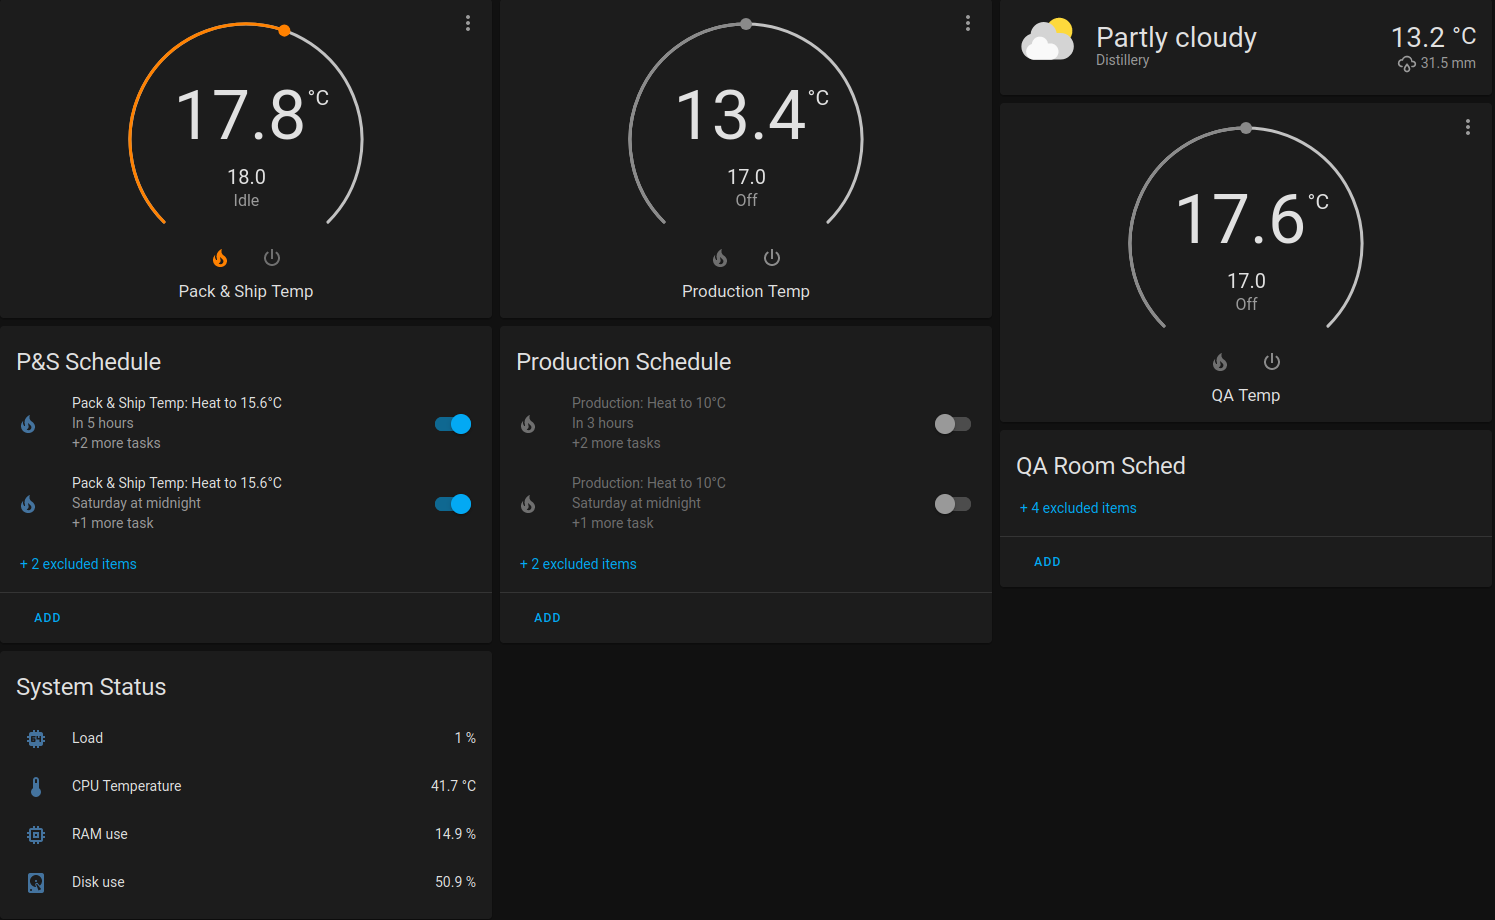
The temp sensor could then be used to control the climate on/off state via the 5V relay as well:

After bench testing, it was time to drill openings into the enclosure for power, the temp sensor input wires, output to the heating switch wires, and R0 mounting:

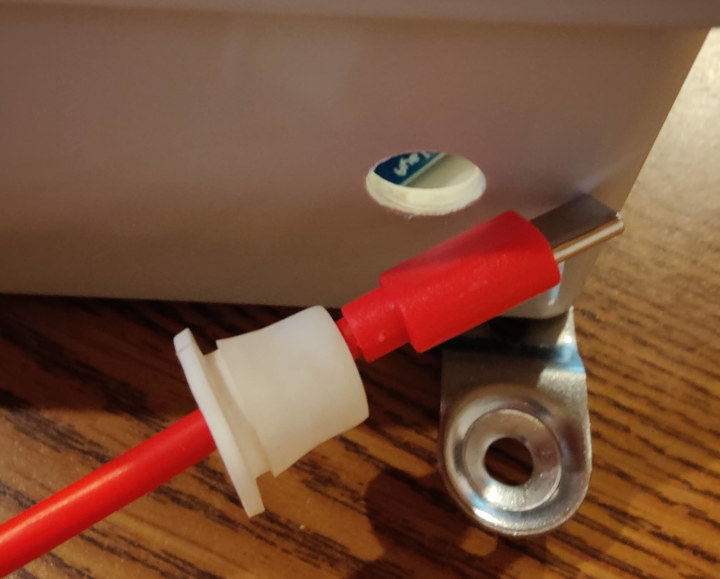
I had a couple old dropper bottles that I cut the tops off of to use as grommets for the wires. As the USB C cable is too big to go through after the grommet is in place, I pushed the wire through before installing the grommet in the enclosure :thinking:

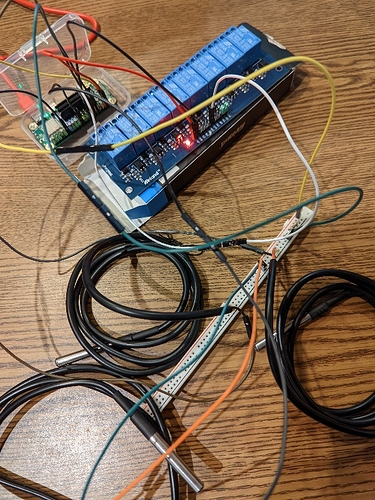
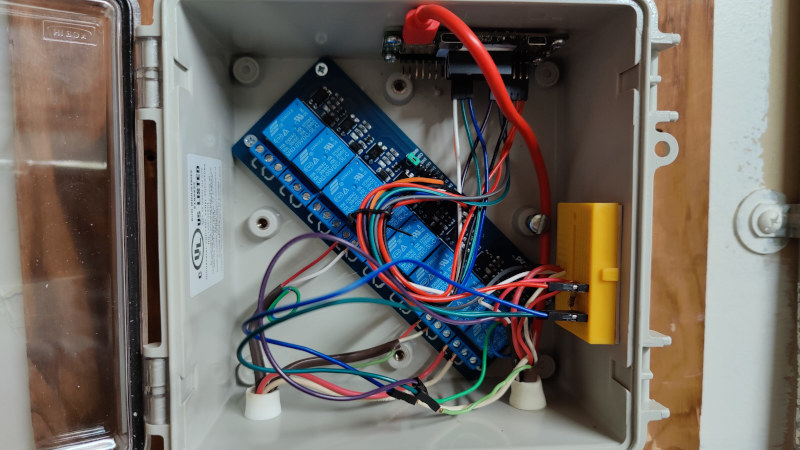
Now it was time to put everything in place. The 5V relay was just a little too long to fit diagonally into the enclosure. I took a fine metal file and rounded the edges ever so slightly. Using the same enclosure with fewer/smaller 5V relays or a larger enclosure would also suffice. The 5V relay has nylon spacers and self-tapping screws to hold it into place. After making all the GPIO connections to the R0, driving M6 screws through the mounting holes, then adding nylon spacers had it ready to mount in place:

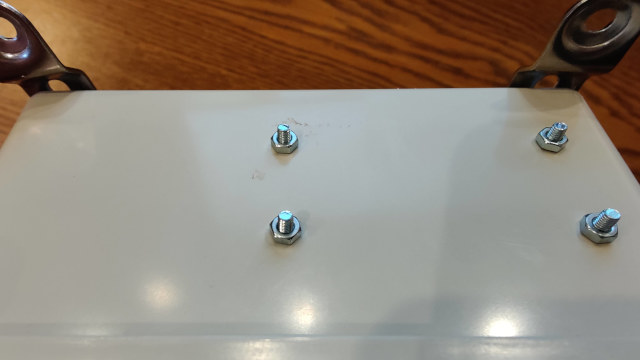
Which was accomplished with finger tight M6 nuts to go easy on the R0:
IMG20220420172824

IMG20220420172818

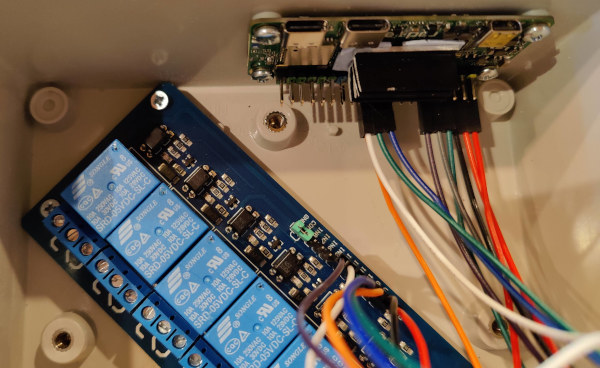
Here’s a preview of the enclosure mounted in place with everything situated inside:

To be continued…

1 Like

Part II

Safety Notice be sure to use the service switch, breaker or other disconnecting means to ensure no voltage is present to the devices you are working on. If this doesn’t make sense or is out of your comfort zone: stop. Get help from a professional.

To integrate the temp sensors, first I took a pic behind the old thermostat:

Note the updrilled slot for the temp sensor. The hole for the existing wiring had plenty of room to feed the extra sensor wire into as well.

Four wires are run to this location, so standard wiring could be used connecting +/-/sig. The twistlock connectors make reverting easy as needed. I used red for +, white for -, and green for signal. Some packing tape holds the sensor in place when reattaching the thermostat faceplate. The sensor points into a corner, be sure it doesn’t contact the wall as that would act as a heat sink:

Prior to wiring up the above hardware, bench testing included how to interact with the GPIO pins to provide the desired controls.

I installed libmraa.

For the five heating zones, I identified the GPIO pins I would use for each zone. I put these in a spreadsheet including pin #, GPIO #, zone #, zone name, and the color of the jumper wire for each zone. The same color jumper wire is used from the R0 to the 5V relay and the sensor signal wire for each zone to the breadboard.

In order to activate the GPIOs, I added an inert mraa command to /etc/rc.local to run at boot-up such as: /usr/local/bin/mraa-gpio set 19 0

This is similar to the gpio command to enable a pin like so:
echo 447 > /sys/class/gpio/export

However I’ve found mraa to be more reliable, especially as direct sysfs gpio interaction is deprecated and could cease to be available in future OS/HA releases.

After exposing the relevant pins in the OS, controlling each zone simply became a matter of closing the normally open heating circuit in order for the existing switching relays to call for heat for that zone.

The call for heat is with setting the pin to high:
mraa-gpio set 19 1
as this closes the 5V relay and thus grounds the circuit.

Once the target temp is reached, setting the pin to low opens the circuit:
mraa-gpio set 19 0

Providing these commands as the ‘ON’ and ‘OFF’ controls for a zone within the switch config via the command_line specifier for HA speaks to both the power of the platform and its portability.

An immediate benefit is the temperature is much more consistent as I also observed with migrating my home to smart heating. I set the threshold to 0.3C with a minimal runtime of 5 mins to prevent rapid cycling, however this setup would allow for even less variation. The old thermostats tend to show the same temps even when they’ve fluctuated by nearly a full degree. Here’s a view of a zone’s target & actual temps and heating runtime:

Needless to say, the even more meaningful benefit is remote access. Now these controls are in place and the day time temps are higher, being able to activate or shutdown a zone at the click of a mouse or touch of a screen feels both futuristic and expected.

This is the HomeAssistant dashboard including controls for three zones:


Mobile looks similar but is stacked into a long scroll.

Here’s the hardware integration in context, the R0 is in the top right corner:

Hope this helps others looking to leverage the power of the Radxa Zero for automation!

Maybe a CM3 might be better so you can take part in the project repo?

Also I have been reappraising the rockpis for what I call project ears where I have low cost distributed mic arrays running KWS to a networked central server.
The new chips mods and revision might of fixed the noise on the ADC so waiting for one to arrive to test but guess if not there is still I2s adc that are cheap and mics or pdm.

Maybe I should also include a temp sensor in each as very little cost any maybe they should have a few sensors maybe LDR, humidty.
Maybe heating control that you can voice control might be a bonus?

Hi @stuartiannaylor, oh cool to see these other projects!

I evaluated the Rock 3A as a candidate but as there was no existing network jack in the utility room, Geekbench5 showed similar performance from the Amlogic S905Y2 & the RK3568, and the R0 being readily available in my market at the time while the 3A was preorder only or source out of country, the R0 became my SBC of choice :upside_down_face:

The portability of docker does mean this could be migrated to a CM3 or alternate system quite easily. Backup copies of the HA config files and docker container provides piece of mind. As our locale gets well below freezing in the winter, I’ve thought about running a standby system which could automatically come online were an issue to arise.

Your keyword spotting project is intriguing. I hadn’t yet considered voice integration. For our home climate control, I employ a couple of these with open source firmware applied. One is tied to our home heating, the other to a Shelly plug operating a dehumidifier in the basement. This sensor may be an option if you’re looking for temp & humidity as well!

Since HA collects a remarkable amount of historical data, the next likely iteration would be to apply a npu to learn from and leverage this data to optimise savings while subsequently reducing emissions. Perhaps some type of bluetooth tile or other occupancy sensor could be used to recognize if an area is in use.

As an intro project, this has me thinking about all the electro-mechanical systems in use at work and how they can be tracked and automated.

Thank you for your insights!

Technically a hass OS can be built for zero and zero2 which can run directly from sd or emmc and not take much ram as in your case dockers and the host os taking most of the memory.

Radxa team can add support to Hass os. I was able to get vim1 and vim3 with the help of agner from hass.io

I think there is a ready solution for your challenge using home assistant, zigbee adapter, zigbee TH Sensor and some kind of controller for the heater.
I use all of the above for my master bedroom climate control :slight_smile:

But interesting to see what you’re doing, as I did plan go do something similar but the time it would take and its maintainence I opted for ready solutions like I explained above.

Node-red with Mosquitto also seems quite popular.
https://cookbook.nodered.org/

Mosquitto is part of the tasksel automated installs and very easy to install but Hass is good with Homebridge for a more apple taste and also openhab

@spikerguy and @stuartiannaylor, thank you for your interest and insights. I had considered installing HomeAssistant as the OS. As the processing power is hardly utilized (mean of 0-1% cpu load), I appreciate having a full linux OS to leverage the available cycles towards other goals. If I find additional monitoring all takes place within HA, I may reinstall that way.

I checked out Node Red & openHAB as part of considering what to run. I appreciate the modularity of HA while having the power to connect to so many disparate ‘entities’. While some co-workers are MacOS/iOS users, I decided to stay systems agnostic and appreciate the customisability and web/mobile presentation HA offers with Lovelace. YAML is an exacting syntax language, however the documentation available is comprehensive.

For my home heating setup, I used a Shelly Plus 1 with an external 12V DC power supply, so it doesn’t have any line voltage and only opens or closes the 24V DC heating circuit.

When I added a motion detecting light control via an ESP32, I also connected a DS18B20 as a secondary temp sensor.

Hope you both enjoyed your weekend!

Thanks. Let me know if you need any help with hass and entities.

From my experience of running hass in my home for most of my electrical device control, I would suggest to go with hass os and not try it with other linux services cause once you have devices configured then you will not like to play with it other than updating cause reconfiguring can take the same amount of time all over again as not all entities get added on a system restore.

Good luck.

Thanks @spikerguy!

With the docker install, the config is on the primary storage (I use /etc/homeassistant) rather than within the container. From my testing, I can restore the docker backup or setup a new one with either working from my config backup. I wanted to ensure this was the case for precisely the reason you indicate: reconfiguring can be a major PITA.

With the winter temps in my locale, heating is especially critical. I’m considering either a cold standby via another R0 preloaded with the same setup or having a hot standby on another in-house server connecting to an ESP32 with the needed GPIO config to read the temp sensors & switch the lo/hi for the relays.

I’ve been integrating the DS18B20 sensors inside the old thermostat casings, so even reverting back to those can be done simply.

Any of these fallback solutions will require manual intervention. For my home heating automation, I installed a DPST switch for ease of going between the old thermostat and smart home controls.

Adding system sensors to HA provides historical data of CPU load, temps, RAM & storage usage. The power of the R0 is evident as these resources are so lightly used!

1 Like