Did you ever get a response? I just had the same problem with a Pi4B. The lack of support for this sort of thing is making me regret this purchase. RasPi’s have solutions for everything under the sun. This is literally me following the instructions step-by-step and then “go post in the forums” where the forums are a ghost town…
Nope. Never a response. I have a pile of boards that are useless due to this same failure.
I have moved on…
Radxa is maybe fine for a personal project, but no way I’m using this for another commercial system. My initial impressions were good, but then the hardware proved unreliable and with zero support for the hardware, I’m done.
This is so annoying. I’ve been scratching my head and attempting to figure this out. I keep getting a failure after the bin gets loaded but it never downloads the image. I’ve attempted this both in linux and windows with the same outcome.
So far returning it not an option. Youtube isn’t helpful, apparetnly all the videos on YouTube are are all centered around the older board where the eMMC is de-attachable to be written, that model works perfectly i have that model and I’m not having issues.
So I’m trying to find if there is another BIN file that can be used, however nothing is avaliable. So if it’s failing I’m wondering if there is something needed on the cable for it to work. Reading thru another Fourm… someone got this working without an issue. So it looks like there isn’t an image… we’ve got that figured out how do we get the image to work though.
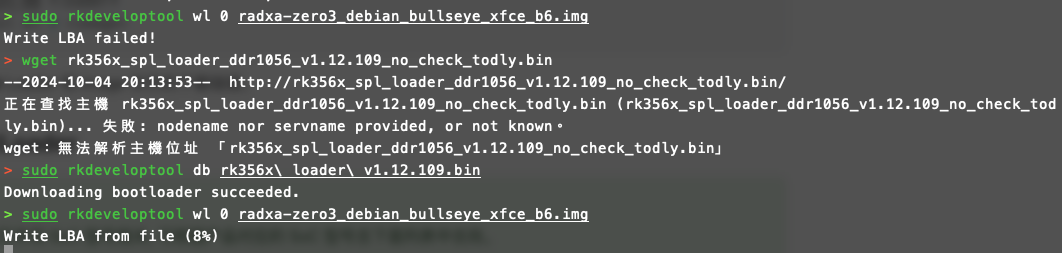
To flash the image to the device, you need to first flash the loader. Here’s the step-by-step process explained in English:
Flash the Loader: You must first flash the loader before flashing the image. The loader is responsible for initializing the system, including memory and peripherals.Use the following command to flash the loader:
sudo rkdeveloptool db rk356x_spl_loader_ddr1056_v1.12.109_no_check_todly.bin
This command downloads the bootloader and flashes it to the device. You should see a message indicating success, such as: Downloading bootloader succeeded.
2. Flash the Image: After successfully flashing the loader, you can now proceed to flash the actual operating system image (in this case, a Debian Bullseye image):
This command writes the image to the device, starting from address 0.
In summary, you must always flash the loader first before you can flash the OS image. The loader prepares the device, and once that’s done, the image can be written.