Rock3A: Failed to flash eMMC from USB

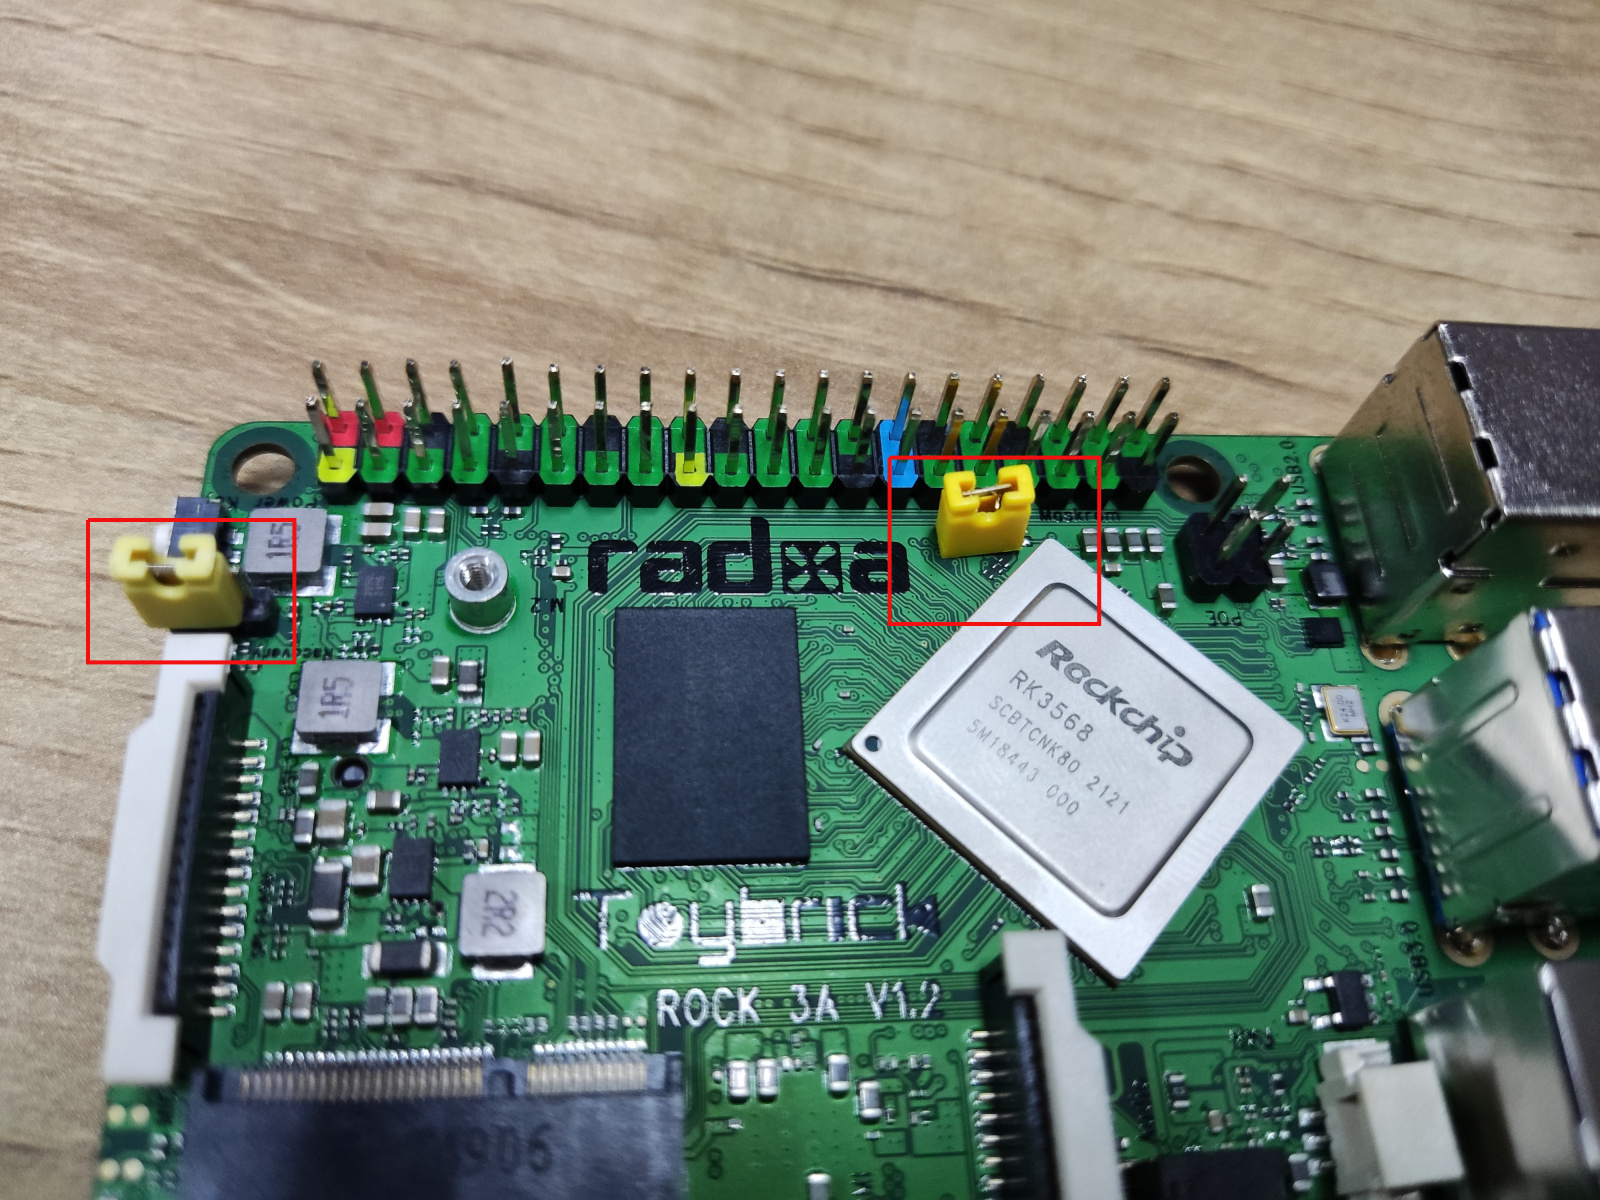
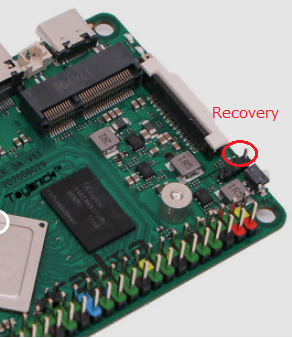
My Rock3A ( v1.2, 4GB RAM and an eMMC 32GB module) is working well after copying a Debian image on microSD to eMMC by dd command. Then, I tried to install a new image to eMMC using USB Type A male to male cable along the instructions of

https://wiki.radxa.com/Rock3/dev/usb-install

.

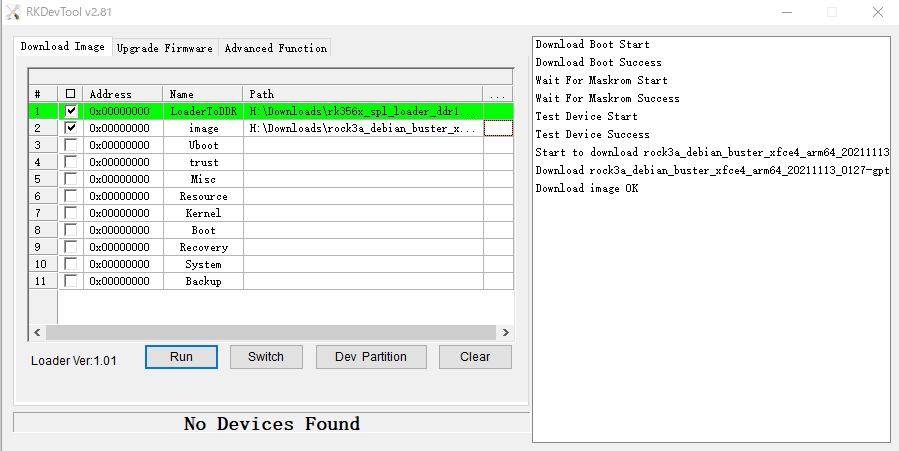
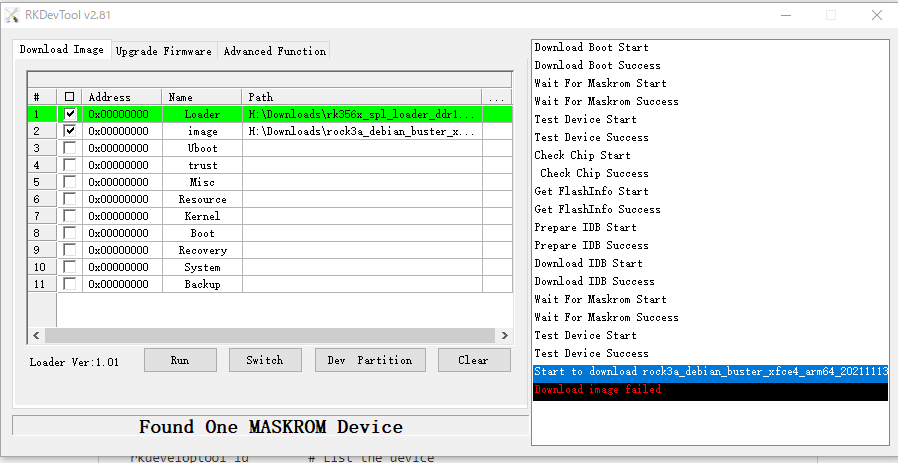
However, the error of “Download image failed” occurred on Windows10 using the RkDevTool.exe as below.

In addition, I also tried this installation on Linux environment (Ubuntu 20.04). The result was below.

— Commands and Results —
$rkdeveloptool -v
rkdeveloptool ver 1.32
$rkdeveloptool ld
DevNo=1 Vid=0x2207,Pid=0x350a,LocationID=302 Maskrom
$sudo rkdeveloptool db rk356x_spl_loader_ddr1056_v1.06.110.bin
[sudo] password for yoshis:
Downloading bootloader succeeded.
$sudo rkdeveloptool wl 0 rock3a_debian_buster_xfce4_arm64_20211113_0127-gpt.img
Write LBA from file (100%)
— End of the results —

The contents of the eMMC were the same as before even though there were no errors.

I did the same procedure several times changing cables and the results were the same.

Please help me on this issue.

Please make sure that the left yellow hat is always there.

Thanks, Stephen.

I tried both shorting the pins at power on the board and always shorting pins though my board does not have pins but has just through holes.

Unfortunately, the situations were quite the same.

I found log files in the directory of "…\RKDevTool_Release_v2.81\Log.
The cause of the error was “image size is larger than partition,image=5859375,partition=16384”.
The RKDevTool.exe seemed to miss the eMMC module. Probably, the “partition=16384” is the size of the SPI flash 8MB.

The content is below,
— Content of Log file —
18:55:32 677 RKDevTool v2.8.1.0 start run
18:56:33 712 Layer<2-2>:Download Boot Start
18:56:33 712 Layer<2-2>:Download Boot Success
18:56:33 728 Layer<2-2>:Wait For Maskrom Start
18:56:34 181 Layer<2-2>:Wait For Maskrom Success
18:56:34 181 Layer<2-2>:Test Device Start
18:56:34 181 Layer<2-2>:Test Device Success
18:56:34 196 Layer<2-2>:Check Chip Start
18:56:34 196 Layer<2-2>: Check Chip Success
18:56:34 196 Layer<2-2>:Get FlashInfo Start
18:56:34 196 <LAYER 2-2> INFO:FlashInfo: 00 40 00 00 00 01 04 00 28 00 01
18:56:34 212 Layer<2-2>:Get FlashInfo Success
18:56:34 212 Layer<2-2>:Prepare IDB Start
18:56:34 212 <LAYER 2-2> INFO:CS(1) (8MB) (SAMSUNG)
18:56:34 228 Layer<2-2>:Prepare IDB Success
18:56:34 228 Layer<2-2>:Download IDB Start
18:56:34 228 <LAYER 2-2> INFO:DownloadIDBlock–>New IDB
18:56:38 213 Layer<2-2>:Download IDB Success
18:56:38 213 Layer<2-2>:Wait For Maskrom Start
18:56:38 681 Layer<2-2>:Wait For Maskrom Success
18:56:38 681 Layer<2-2>:Test Device Start
18:56:38 697 Layer<2-2>:Test Device Success
18:56:38 697 Layer<2-2>: Download rock3a_debian_buster_xfce4_arm64_20211113_0127-gpt at 0x00000000…
18:56:38 697 ERROR:DownloadImage–>image size is larger than partition,image=5859375,partition=16384
18:56:38 712 Layer<2-2>: RunProc is ending, ret=0
— End of the file —

I gave up this flashing method. Something is wrong on my board.
Then, I will use the dd command though that needs two copy steps of big file. And I also don’t like many times insertion / removal of the eMMC due to the Electrostatic discharge.
Thanks.

[Solved]
Hello, Stephen,

I tried another one procedure since I was worried about the previous error log. It seemed that the image was tried to be downloaded to the SPI Flash.

So, I studied how to disable the SPI Flash function. When I looked into the rock3a_v1.3_sch.pdf, shorting the pin1 and the pin2 of recovery key seemed to stop the SPI Flash function. At last, I could flash the eMMC and back up the content in eMMC.

The procedure is below.
1, Do not remove eMMC module and power off.
2, Short the two holes as you attached the picture. I’m using a small probing clip.
3, Power on.
4, Remove the shot clip and short the pin1 and pin2 of recovery key

Recovery_Key
#On Linux

*To flash eMMC
sudo rkdeveloptool db rk356x_spl_loader_ddr1056_v1.06.110.bin
sudo rkdeveloptool wl 0 rock3a_imagefile_gpt.img
*To backup image
sudo rkdeveloptool db rk356x_spl_loader_ddr1056_v1.06.110.bin
sudo rkdeveloptool rl 0 31250000 backup_gpt.img #For 16GB image

#On Windows
Using RKDevTool, select row1,2.
Row1, 0x00…,LoaderToDDR (Not Loader),…\rk356x_spl_loader_ddr1056_v1.06.110.bin
Row2, 0x00…, image , …\ rock3a_imagefile_gpt.img

Push the Run button to flash eMMC

Regarding the transfer speed for flashing 3GB image, Ubuntu 20.04 on Windows Vmware took 139 seconds and RKDevTool took 83 seconds.

I could not find how to backup image using RKDevTool.

I like this procedure because I don’t need to remove eMMC module to enter MASKROM mode.
Then, I’d like to use this method if there is no risk of damaging eMMC module.
What do you think of this procedure?

1 Like

Great.

It seems that this application doesn’t provide function of backing up system.

Thanks for the additional info. I realized the RKDevtool is an update/upgrade tool. I’ve stopped searching the information.

Anyway, the rkdeveloptool is very useful for downloading new built image because the build environment is Linux even though the transfer speed is a bit slower than that of RKDevtool.

Hello! How to write data to eMMC via USB? I built my OS, but RKdevTool only reads signed files. How to evade this check and write whatever I want on eMMC. Now I have to boot from the SD card and write eMMC from the running system. I don’t want to use SD cards to write OS to eMMC.