HOWTO: KODI, VDR, ambilight, UBUNTU and X11

Have you ever wanted a fully accelerated KODI including VDR (Video Disk Recorder), ambilight, complete UBUNTU and openGL-accelerated X11 on your little Radxa Zero or Zero 2? My github https://github.com/beta68/cevdrx11 describes, how this can be set up.

The idea is quite simple: first, a complete CoreElec system is installed. Afterwards, a complete UBUNTU system is installed within a chroot environment. Remote control allows switching between KODI and VDR and even allows starting X-windows system using lxde windows manager.

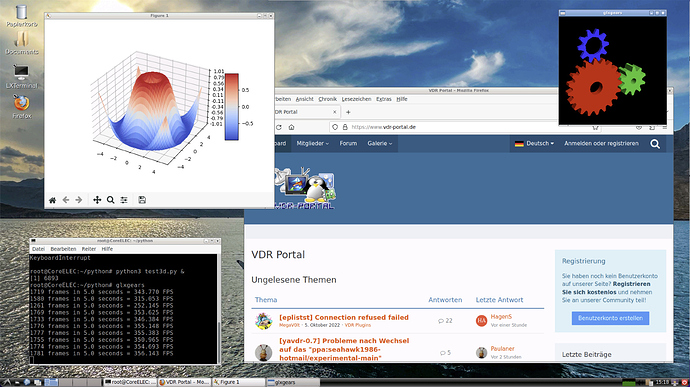
The screenshot below should give a first impression for X11 and lxde. CoreElec screenshots can be found their website (as a new user I only can post 2 links), VDR screenshots at German tvdr website. There is also a German forum available. Your might need a translator. Please see https://www.vdr-portal.de/forum/index.php?thread/135070-howto-installation-eines-vdr-innerhalb-von-coreelec-amlogic-only/ for more information. My ambilight (APA102) is controlled by a little Arduino Nano. Kernel grabbing is working perfectly as well.

I tested python (Matplotlib and Jupyter-lab are working), glxgears (350 fps) and firefox with Youtube videos. Additional UBUNTU packages can be installed using apt. While KODI is able to play almost every audio format (stereo, DD, DD+, multi channel…), my lxde installation uses pulseaudio to control the audio output.

Network settings must be done in CoreElec and will also work in chroot environment. WIFI is working perfectly (also on 1.51 model). The system is very stable (I haven’t had a single crash or hang-up since weeks). For my system I am using a FLIRC receiver. My TV recordings go to an 256 MB SD-card. The complete system will fit on a 16 GB eMMC.

To my opinion there are only two drawbacks. The kernel version is fix at 4.9 (no mainline) and the complete system is running at root. However, in return you will get a fully accelerated media center playing almost all video formats and a complete UBUNTU 20.04 system including X11 and lxde desktop manager.

My repository also includes a CoreElec version (update .tar file) 19.3 to which I backported the ambilight kernel patches. This was the last version supporting HDR to SDR video conversion (my 4K TV cannot display HDR content). This version can only be used for Radxa Zero. Radxa Zero 2 requires at least a CoreElec version 19.5. All my scripts are for a 4K TV. However, they can be easily changed for a full-HD (1080p) TV.

Have fun,
beta
1 Like

I programmed a first script that installs the VDR under a CoreElec environment.
The script is attached to this thread and I will - as soon as I have some time - deposit it on Github and post the link here.

It’s called install.sh.zip:

install.sh.zip

(14.66 KiB) Not downloaded yet

The installation works like this:

  1. install and configure CoreElec on a supported device. This includes the installation of the DVB drivers, because VDR needs them later and the configuration of the network, because that will be used later in the chroot environment. Please also set up the ssh access (with secure password!).
  2. download and unpack install.sh.zip. Unpacking can also be done later using CoreElec.
  3. copy install.sh to the CoreElec device in the /storage directory.
  4. connect to CoreElec via terminal (ssh) and make install.sh executable (chmod 775 install.sh)
  5. call the installer like this:
./install.sh

The CoreElec device needs a network connection.

The installer will perform the following steps:

  • Download the Ubuntu minimal image of Hardkernel.
  • Extract the root from this image
  • Update the image and install all missing packages
  • Creating the /home/user directory
  • Selection of the correct libMali.so depending on the architecture
  • Download of VDR, softhdodroid and externalplayer
  • Compilation of VDR and the plugins and installation
  • Generation of all necessary scripts
  • Implementation of FLIRC or alternatively LIRC or keyboard
  • Enable all scripts
  • Setting the timezone for VDR

During the installation you have to press RETURN a few times (please accept the default settings of the packages). I will change this at a later time. At the end the timezone has to be configured.

There is still a TODO list, including

  • The file on.sh in the user directory still uses a fixed FLIRC event. This still needs to be automated.
  • The installer is still quick and dirty and not commented
  • KODI add-on
  • For different devices the scripts have to be adapted slightly (FLIRC, LIRC, keyboard).

VDR is located in the directory /home/user/vdr. In the user directory are also many scripts, e.g. runvdr, which can be extended as desired. The KODI scripts are located under UBUNTU/vdr or in /storage/.config/system.d.
The installer is still quick and dirty. After I put it on Github, I will comment it and make it nicer. Maybe someday I’ll make it a KODI addon that does everything graphically under KODI.

Since the script runs under root, please be careful with it and make a backup of important data beforehand. I do not guarantee that there is not a bug somewhere.

If you want to use the chroot environment under a bash you can proceed like this after the installation:

ssh root@ip-coreelec
./ubuntu.sh
cd UBUNTU
chroot . /bin/bash

You can save the command ./ubuntu.sh if the VDR is already running. Then everything is already correctly merged.
The network is configured automatically and can also be changed in KODI. The chroot environment takes over this then.

Have fun with testing,
Rudi