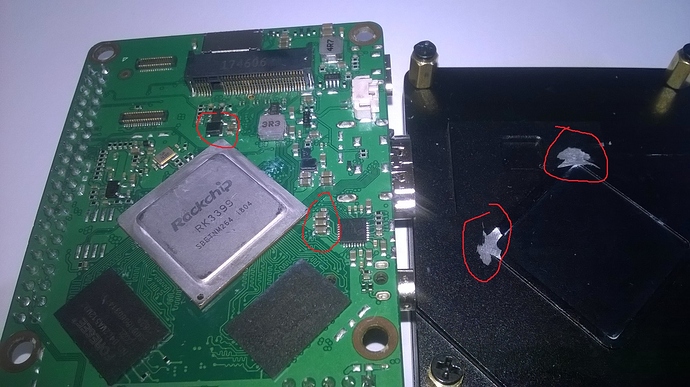
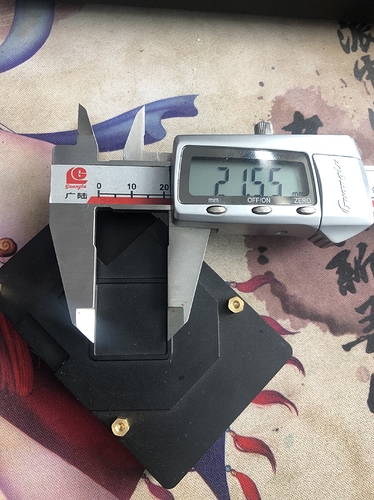
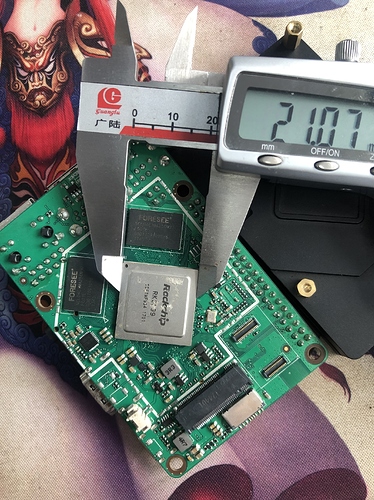
Is there any precaution when mounting the heatsink to rockpi 4B ? I have 2 board now broken after mounting the heatsink
Mounting heatsink precaution
Please send some pictures of the back of the damaged your ROCK Pi board
there is no physical damage actualy , I still investigating other possibility, should I delete this topic ?
I had the problem with heatsink. The square embossing rounding the cpu is pressing a choke and broke it. As a precaution, I filed out critical areas, please see the picture.
The photo gives the impression that the circuit board and most components around the CPU were contaminated with thermal paste. This can cause short-circuits, as thermal paste contains high amounts of metal, which makes it conductive even for electrical currents.
These two areas do need to be handled with care!
But in fact, be careful with the assembling, there’s no interference in these two areas
please be careful and careful when assemble the heatsink, because of the heatsink is metal!
In my case , the board is won’t boot, but the problem is not coming from the heatsink, it is because I am using phone charger which can only out 5V while the board need more than 5V, problem solved when I replace using charger which have output 12V like QC 3.0
Thanks
that is great! finding the problem and fixing it by yourself
Your pictures are proving my point: the embossing is wider than the CPU and the choke is almost as high as the CPU. There is no point in having that embossing, anyway.
Not every thermal paste is containing a metal. The white one usually doesn’t, and it is also used on transistors isolated from the heatsink, like those in PSU and audio amplifiers.
That’s right, my mistake, it gave the impression that all pastes contained metal, it should have been called many pastes contained high quantities of metal. But the color is no indication of whether metal is contained or not. Powdered metals can be white or light grey. In the meantime so many different kinds of heat conducting paste are sold, for utopian high prices up to extremely cheap and partly the containers are badly or not at all labelled. I think it is safer for casual hobbyists to assume that the paste is electrically conductive.
Embossing is to guide of the silicone grease
we adjust the width if the results improve
On my side, to avoid this issue I put a little copper pad between the heatsink and the processor. I put Artic MX-4 thermal compound on the two sides of the pad and everything work well. Temperature stay between 39C and 42C when I play movie with Librelec. I do not tested it with sbc_bench…
Hi,
I’m a new (and hope happy) owner of Rock Pi4 v1.4 , arrived few minutes ago in Italy.
I bought it with its original large black heatsink.
I’ve placed all the thermal paste supplied with the heatsink on internal area of Heatsink covering the CPU.
Before power on I asked myself. Did I followed the correct procedure? And seaching I landed on this forum, and now I wander to power on the Rock Pi4.
In fact removing the heatsink, I discovered a portion near CPU (around SPI area) covered by thermal paste:thinking:
The bag containing the thermal paste has the following label:
HEATSINK COMPOUNDS
soft pack
Stars
Now my question is:
a) Before I power on the board, can someone from Radxa formally declare that the thermal paste it supplies with heatsink is safe for the board even if it exceed on the board?
b) alternatively some suggestions **how to perfectly remove exceding paste ** ?
Thank you in advance.
I am not a Radxa employee but I understand a bit of hardware.
This thermal paste is nonconductive so it can extrapolate the area and contact the processor without problems.
However, it is advisable to use a small amount, as this will not cause better performance.
Just making Borad dirty.
Over time the part will harden and become difficult to remove, I recommend removing with isopropyl alcohol and a soft toothbrush, wipe with napkin to finish.
Thank you for quick answer. I had a look at that video. The only problem not faced by this video is when thermal paste goes on IC components.
However, at the end I removed the paste with a tooth brash and some toilet paper.
After crossing my fingers I powered on and… all is OK!
My error was surely putting too much paste, but - please correct me if I’m wrong - but I didn’t find any precise instructions on how much to put.
Manufacturers generally do not explain this issue in detail, even famous manufacturers like INTEL and AMD do not detail the application.
I found another video that shows a little more detailed
How To Apply Thermal Paste


